How to Build a Shed Pad: A Complete Guide
How to Build a Shed Pad: A Complete Guide
A shed is only as excellent as the base it sits on. Skip the pad or build it poorly and you will end up with a mess: a door that sticks and walls that rack along with water collecting around the base and a shed that slowly sinks or comes out of level within a year or two. Construct the pad in the right way and your shed will stay dry and structurally sound for years to come.
This article will discuss every stage of constructing a shed pad along with steps on selecting the right type and location to laying the final base material. This will help you set your shed up for decades to come.
What Is a Shed Pad and Why It Matters?
A shed pad is the level and a consistent base that sits below a shed offering drainage and weight distribution along with a flat surface for the structure to rely on. Without the support, a shed sits directly on soil or grass which keeps moving with moisture and it freezes and expands in winter. Moreover it invites rots and pests. A well built pad keeps the shed off the ground and shed water away from the structure. It also spreads the weight of the shed evenly such that all the points sinks together and not one faster than another.
The right type of pad depends on the size and weight of the shed, the soil conditions on your property, local climate, and how permanent you want the structure to be. Smaller storage sheds can often get away with a simple gravel or paver pad, while larger sheds, workshops, or anything with plumbing or heavy equipment usually call for a poured concrete slab.
Step 1: Choose the Right Type of Shed Pad
| Gravel Pad | A gravel pad is the most budget-friendly and beginner-friendly option. It drains extremely well, resists frost heave better than solid pads, and can be built in a weekend without specialized tools. It’s best suited to small to medium sheds without plumbing, in areas with reasonable drainage. |
| Paver or Concrete Block Pad | Pavers or concrete blocks laid over a compacted gravel base offer a cleaner, more finished look than loose gravel while still allowing some drainage. This option works well for mid-sized sheds and gives a stable, walkable surface. |
| Concrete Slab | A poured concrete slab is the most durable and permanent option, ideal for large sheds, workshops, or any structure with heavy tools, vehicles, or plumbing. It requires more planning, tools, and curing time, and often benefits from professional help, especially for larger pads or where local codes require reinforcement or a permit. |
| Wood Frame with Skids | A skid foundation uses pressure-treated wood beams laid directly on gravel or compacted soil. It’s a good middle-ground option for portable or smaller sheds, since the structure can be moved more easily than one on a fixed concrete pad. |
Step 2: Check Local Codes and Requirements
Before digging anything, check with your local building department or homeowners association. Many municipalities require a permit for sheds over a certain square footage, and some have specific rules about setbacks from property lines, fences, or utility easements. Skipping this step can lead to fines or being forced to move the shed later, so it’s worth a phone call or a few minutes on your city or county’s website before you start.
Step 3: Pick and Prepare the Location
Choose a location that is naturally well-drained, away from low spots where water collects, and clear of tree roots and low-hanging branches. Ideally, the site should be relatively flat already, since excessive grading adds time and cost. Leave enough clearance around the shed for maintenance access and airflow, and confirm there are no buried utility lines before you dig, most areas offer a free utility locate service that will mark lines for you.
- Call for a utility locate at least a few days before digging.
- Choose ground that slopes slightly away from the shed for natural drainage.
- Avoid placing the pad directly beneath large trees, which drop debris and send roots underneath over time.
- Confirm the site meets any required setback distances from property lines and structures.
Step 4: Mark and Excavate the Area
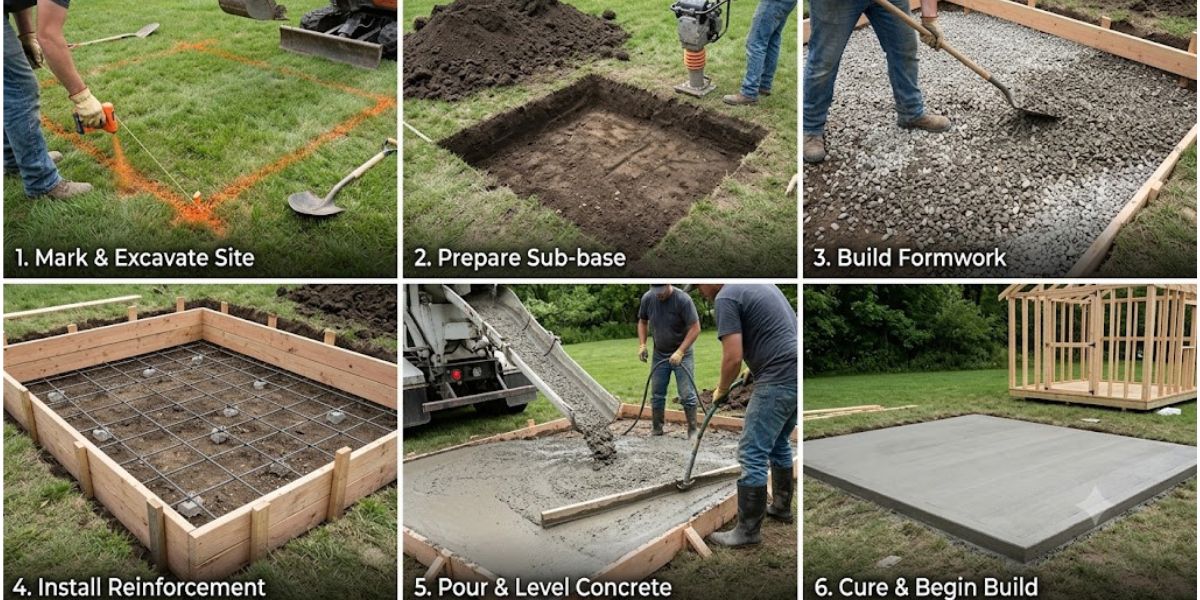
Use stakes and string, or a can of marking paint, to outline the exact footprint of your shed pad. Add roughly 6 to 12 inches of extra width and length beyond the shed’s actual dimensions to give yourself a margin for adjustment and drainage. Once marked, remove the sod and topsoil to a depth of about 4 to 6 inches for a gravel or paver pad, or deeper if you’re pouring concrete and need room for a gravel sub-base plus the slab itself.
- Mark the perimeter with stakes and string, squaring the corners using the 3-4-5 triangle method.
- Remove grass, topsoil, and any roots or debris within the marked area.
- Excavate to the appropriate depth for your chosen pad type.
- Check the excavated area for level, and note any high or low spots that need adjustment.
Step 5: Add and Compact a Gravel Base
Regardless of which final pad type you choose, a compacted gravel base underneath improves drainage and stability. Spread a layer of crushed gravel, typically 3 to 4 inches deep, across the excavated area. Use a hand tamper or plate compactor to compact it thoroughly in layers rather than all at once, since compacting gravel in thin lifts produces a much more stable base than trying to compact one thick layer.
Check level frequently as you go, using a long level or a laser level for larger pads. This is the stage where small corrections are easy to make and large ones become expensive later, so take the time to get it right before moving forward.
Step 6: Build the Pad Surface
| For a Gravel Pad | Add a second layer of finer gravel on top of the compacted base and rake it level. Compact again, then check level one final time before placing the shed. |
| For a Paver Pad | Add a thin leveling layer of coarse sand over the compacted gravel base, screed it flat using a straight board, then lay pavers or concrete blocks tightly together in your chosen pattern, checking level after every few rows. |
| For a Concrete Slab | Build a wooden form around the perimeter to the correct height, add a layer of rebar or wire mesh for reinforcement, and pour ready-mix or delivered concrete into the form. Screed the surface flat, float and finish it, and allow it to cure for at least several days before placing weight on it, and closer to a full week before setting the shed. |
| For a Skid Foundation | Lay pressure-treated skids across the compacted gravel base, spaced according to your shed’s construction plans, and check that each skid is level both individually and relative to the others before securing the shed frame on top. |
Step 7: Final Level Check and Drainage Confirmation
Before placing or building the shed, do one final level check across the entire pad in multiple directions. Confirm water drains away from the pad rather than pooling on or under it, especially after a test with a hose if you have time before construction. Catching a drainage or level issue now is far easier than dealing with a shifting shed months down the road.
Common Mistakes to Avoid
- Skipping the gravel sub-base and pouring concrete or laying pavers directly on soil, which leads to shifting and cracking.
- Compacting gravel in one thick layer instead of multiple thin, well-compacted lifts.
- Building the pad too small, leaving no margin around the shed’s actual footprint.
- Ignoring drainage and placing the pad in a natural low spot on the property.
- Not checking local permit requirements before starting construction.
- Rushing the concrete curing time before placing weight on a poured slab.
Tools and Materials You’ll Typically Need
- Stakes, string line, and marking paint
- Shovel, mattock, or a rented sod cutter for excavation
- Hand tamper or plate compactor
- Crushed gravel and, if applicable, leveling sand
- Long level or laser level
- Pavers, concrete blocks, form lumber, rebar, or pressure-treated skids depending on pad type
- Wheelbarrow, rake, and a screed board for spreading and leveling materials
Frequently Asked Questions
Do I really need a shed pad or can I just set the shed on grass?
A shed placed directly on grass or bare soil will settle unevenly, trap moisture against the floor, and likely rot or shift within a year or two. A proper pad is inexpensive insurance against much costlier repairs later.
How thick should a gravel shed pad be?
Most gravel pads use a compacted base of 3 to 4 inches, sometimes finished with an additional thinner layer of finer gravel on top, for a total depth of roughly 4 to 6 inches depending on soil conditions.
Do I need a permit to build a shed pad?
It depends on your location and the size of the shed. Many areas exempt small sheds under a certain square footage, but larger structures, especially those with plumbing or electrical, often require a permit. Always check with your local building department first.
How long does concrete need to cure before I put the shed on it?
Concrete typically reaches enough strength to walk on within 24 to 48 hours, but it’s best to wait at least 5 to 7 days before placing the full weight of a shed on a new slab, and up to 28 days for full cure strength.
What size should the pad be compared to the shed?
A good rule of thumb is to make the pad 6 to 12 inches larger than the shed’s footprint on all sides, which gives room for drainage, trim overhang, and minor adjustments during placement.
Can I build a shed pad myself or should I hire a professional?
Gravel, paver, and skid pads are very achievable as a DIY project for most homeowners with basic tools and a weekend of time. Larger concrete slabs, especially those requiring permits, reinforcement, or significant grading, are often worth hiring a professional for like Earthwest Civil, particularly if the site has drainage challenges or uneven terrain.
How do I keep water from pooling under my shed?
Choose a site with natural slope away from the pad, use a well-compacted gravel base for drainage, and make sure the surrounding grade directs runoff away from the structure rather than toward it.
Is gravel or concrete better for a shed pad?
Gravel is cheaper, drains well, and is easier for a DIYer to install, making it ideal for smaller sheds. Concrete is more durable, provides a completely flat and permanent surface, and is the better choice for larger sheds, workshops, or anything with heavy equipment.
Related Articles

Bulk Earthworks vs General Earthworks: What’s the Difference?
Earthworks form the base of almost every construction project whether it is…
How Much Does a Driveway Cost to Build in Perth?
Constructing a new driveway in Perth can drastically change the appearance and…
How to Prepare the Ground for a Horse Arena
A well developed horse arena begins from under the surface. Before implementing…